

There are so many wrap carries but they are made up of combinations of a few standard woven wrap passes.
Understanding woven wrap passes offers you these benefits:
So here’s a primer on the different wrap passes that make up nearly every back carry:
The main wrap pass in a Rucksack Carry is a Rucksack Pass, of course.
Rucksack Pass is a high pass that is most comfortable when baby’s shoulders are even with your own.
This gives your baby or toddler a great view of the world!
It goes over both of your shoulders so as long as you keep your top rail (edge) snug, it protects against leaners. Babies and toddlers can’t lean away from your back with that high top edge!
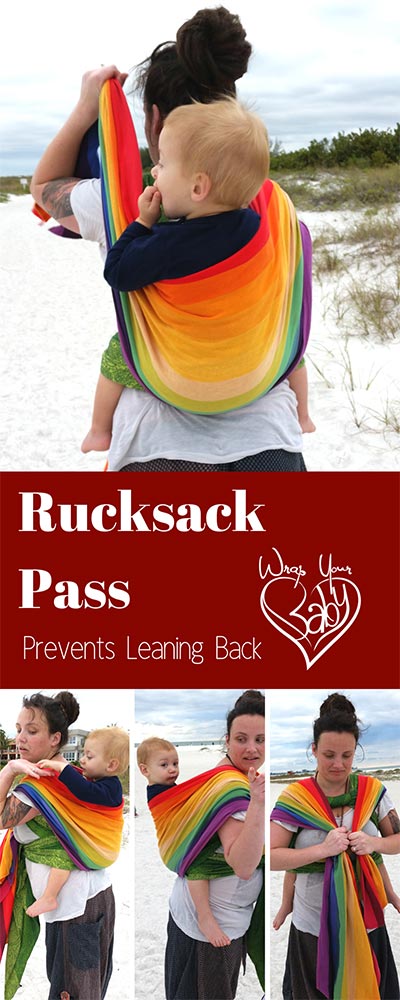
See that top rail (red stripe) above? Yeah, there’s some slack in it or baby would be closer to mom’s back.
You can solve that by pulling on the red stripe on either tail where it comes in front.
Ziiiiip, baby will be tugged right against you where you want him!
How to do a rucksack pass video tutorial with a woven wrap (check out how to tighten the top rail at around 0:35):
You can use a Rucksack Pass with baby’s arms in or with arms out. In this case the top rail of the wrap will come up to both of baby’s or toddler’s armpits and if snug will still be very secure. You can see this in the video above.
Traditional Sling Pass (TSP) is often called simply Sling Pass, and was formerly called Rebozo Pass.
Like the Rucksack Pass, Traditional Sling Pass hold baby close against your back with a high top rail. In fact, Traditional Sling Pass is even snugger for holding baby against you and makes for some very comfortable carries.
Some people find it easier to get a good seat with Traditional Sling Pass compared to Rucksack Pass. You can get a good, secure seat with either kind of pass. Just make sure the bottom rail (edge) of the wrap comes down under baby’s bottom and then up to baby’s knees, hiking them upward slightly.
You can also do Traditional Sling Pass with arms in or arms out as shown below.


How to do a traditional sling pass video tutorial with a woven wrap:
A Cross Pass looks similar to a Traditional Sling Pass but tucks under baby’s knee before coming around mom’s side.
Because of this tuck under the far leg, the cloth is actually coming between baby’s legs so there is a built in seat that can never be “popped” by seat-poppers (also known as leg-straighteners).
So woven wrap carries with one or more cross wrap passes are appreciated by those moms and dads that have trouble keeping a seat under their baby!

In the picture above, toddler is wrapped in the green wrap while the passes are demonstrated in the rainbow wrap. You can see that the cross pass should cover baby or toddler from shoulder to shoulder (or with an arms out carry, up to both armpits) and from knee to knee, before tucking under that far knee.
NOTE: a cross pass is not safe by itself because baby can lean out on one side. It must be combined with one or more other passes.
How to do a cross pass video tutorial with a woven wrap:
You can also do a BUNCHED CROSS PASS. This pass goes over one leg and under the other as with a regular Cross Pass, but the wrap is bunched under baby’s bottom and not spread across baby:

Obviously this would not be one of the main passes of the carry but must be combined with passes that will – you know – actually hold and support your baby!
A Bunched Cross pass can help secure the seat on a carry and is often done towards the end of the carry to bring the wrap back around to the front to tie.
For example, Rucksack Carry ends with two Bunched Cross Passes.
How to do a bunched cross pass video tutorial with a woven wrap:
When you spread a Bunched Cross Pass over baby’s bottom, you get a Reinforcing Pass or Reinforcing Cross Pass.
It comes from under mom or dad’s arm, spreads over baby’s bottom, and tucks under the far leg.
Using a Reinforcing Pass provides more support and helps protect against seat-popping.

How to do a reinforcing cross pass video tutorial with a woven wrap:
The Wiggleproof Pass looks exactly the same as the Cross Pass so no new picture (what would be the point?) – the difference is that the Wiggleproof Pass is started at the bottom, comes under baby’s knee and up over baby’s back to go over your opposite shoulder.
So it’s the same pass in the end.
But it’s a different skill to put it in place.
It’s a little more challenging than a Cross Pass. For one thing, you’re working against gravity.
But you can absolutely learn it.
How to do a wiggleproof pass video tutorial with a woven wrap:
A Horizontal Pass, or Torso Pass, comes under both the parents arms and go straight across baby horizontally.
Because both ends go under your arms, the top edge of these woven wrap passes cannot be any higher than your armpits, and so it is not a pass that holds baby high on your back.
If it is one of the main passes of your carry, as in Back Wrap Cross Carry, that is a carry that will position baby lower on your back.
MYTH-BUSTER: It is not true that your baby should always be wrapped high on your back. Some high back carries are very comfortable and some low back carries are very comfortable and equally secure.

How to do a horizontal or torso pass video tutorial with a woven wrap:
You can also do a bunched horizontal pass behind baby’s knees:

When you use a Bunched Horizontal Pass, the wrap goes over both of baby’s knees and under baby’s bottom. It is a finishing pass that helps secure and finish a carry.
How to do a bunched horizontal pass video tutorial:
All the different back carries you can do with your wrap are made up of these basic passes and when you learn them, you can see how to mix and match different passes to create a carry that checks all YOUR boxes that you need to carry your baby.
In my Back Wrap Challenge I help you learn your first successful back carry so you can wrap your baby or toddler on your back every day and in my exclusive membership Woven Wrap Guild, I give you a library of resources and a specifically sequenced course of action for learning all your wrapping skills faster and easier. You go through the course at your own pace with the support of a friendly community of like minded moms and personal help as you progress!
Was this entertaining? Drop your email here to get similar content delivered straight to your email inbox!
One Response